Archived Ideas for ‘10 October’

IDEA 99: BE FLEXIBLE

It’s already October. The temps have been dipped long enough that it seems like they may not recover, and there have been more clouds and rain than sun in a very long time.

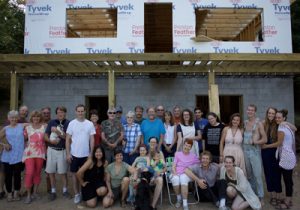
My mission starting the beginning of the year was to take a year off work and spend the summer working on our multi family vacation home. (This is my fourth post about it, if you want to go back and read!) Every August we have a big family reunion and while we enjoy doing most of the cooking and eating outside, finding places to sleep can be hard. A little tiny piece of me thought if the building was enclosed by then we could have a grand camp-out on the floor. Spoiler alert: that didn’t happen. In August the top floor of the house was still missing, so there were a lot of tents pitched.

We hired an amazing local contractor to build the shell and we were planning on taking it from there, thankyouverymuch. We reasoned we’ve (well, my husband has) put in electrical, we’ve (well, him again) has done lots of plumbing. As long as the big boys put up walls and a roof, we would spend (in my view) a magical, worry-free summer hanging and mudding drywall, laying wood floors, painting, tiling, etc, etc etc.

Obviously it didn’t quite turn out that way. In precious few weeks I will be forced to go back to civilization and furnace heat, and we haven’t laid a single tile, painted a single wall, placed a single floorboard.

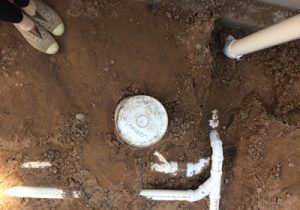
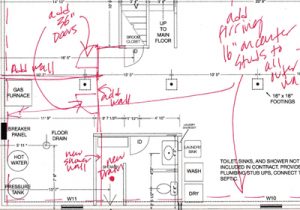
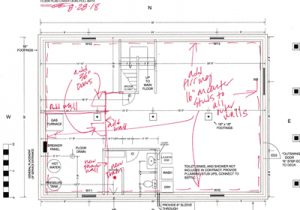
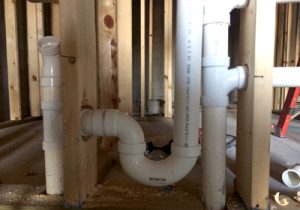
The first mishap happened when the site was still dirt. Since we wanted a shower in the basement, the plumber dug and buried the first pipes in the ground. Many weeks later, the walls went up around them and I could see that the drain pipe was not where it was supposed to be and now the drain wouldn’t be centered in the shower. It’s really important (to me, anyway) to have the drain centered. And one of the walls could not move as it had the stack in it. So, I asked for the other wall to move in and lost several inches of space in the shower (which we gained in the rest of the bathroom). By the time I finally saw the plumber again I mentioned the error and he said when he was digging he came upon a huge bolder that couldn’t be moved. So he put the pipe as far over as he could. In the end, I think improvising an alternative plan saved us all from a lot of stress and heartache.

So began the process of flexing.

My summer of DIY became my summer of watching DIY videos while being available if needed, and posting the progress on Instagram. 

As the walls went up it was easier to see what I had designed. Occasionally, there would be something that just didn’t look right. Sometimes it was because the carpenters went off the plan. Sometimes it was that they stuck to the plan but it just didn’t work the way it was supposed to. Sometimes it was just because code said it had to be that way. With such a wonderful, professional crew, we had a lot of communication, and whether it was my boo-boo, theirs, or nobody’s, we talked it through and came up with solutions.

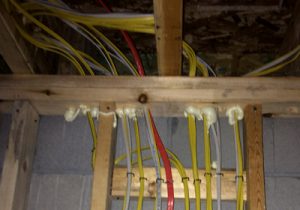
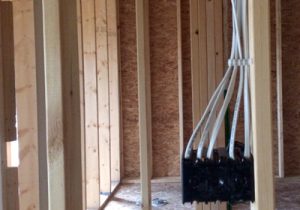
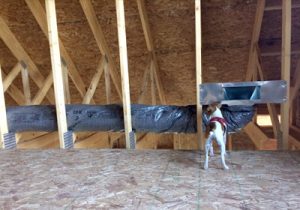
Probably the biggest turn was that I realized I was dreaming if I thought we could string the electric (or heating ducts and vents or plumbing pipes). OK I knew we couldn’t do the plumbing pipes-that was on the contractor’s list already. But since these other things were not included in our contract, I received a trial-by-fire education on how to be the contractor and hire subs.


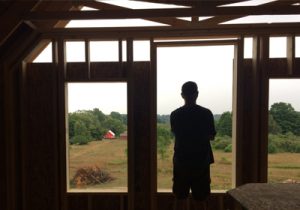
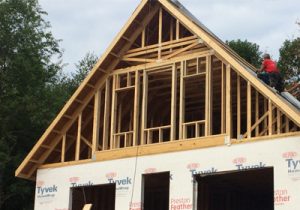
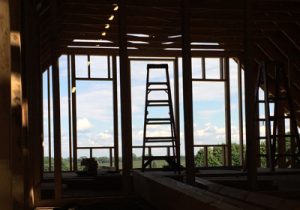
At one point, my brother climbed a ladder to look out the second floor and asked why the hell I hadn’t designed more windows in the front where the view was breathtaking. I had put big windows on the main floor below, but the upstairs had bedrooms so I had treated them more traditionally.

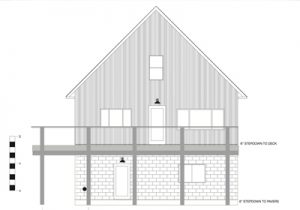
The original window plan:

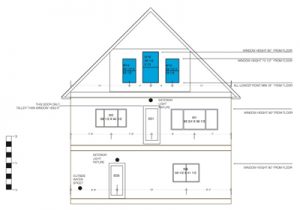
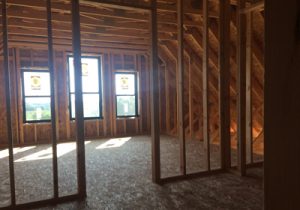
Fortunately, I had two windows I wasn’t planning on using. I had designed them in and then found out they came too close to the floor for code. The upper walls hadn’t been framed in yet, so I got back on the computer and found that I could create a pretty, and very window-fied wall by using one of the big windows flanked by what had been marked for the front and back bedrooms. With the shorter windows on each side I could raise the bottoms to fit within code and it didn’t look odd because the smaller windows justified the height of the lower edges. Then I used the other large one in the back where it neatly framed a giant oak tree. You don’t really notice it’s riding quite high in the room (almost to the ceiling). All you notice is the magnificent tree.

The new window plan:

The morning I went down to the build site to ask the carpenter about the change, I was pretty nervous. Even if I don’t have it all under control, I like to pretend I do, and to admit I was changing my mind on such a big thing felt kind of irresponsible at best, and indecisive at the worst. I brought down a loaf of zucchini bread and a copy of my new plan. Luckily the contractor had beat me to it (he texted the head carpenter after I had texted him). “It’ll work”. Is all my carpenter said to me, and then “We all wondered why the hell you didn’t design in bigger windows up there.”

So, instead of drywalling, painting, and putting in a kitchen and bathrooms this fall, I’ll be lucky if the subs’ portion gets finished so I can head back to civilization for the winter. And instead of putting on finishing touches in the spring it will be an all-out major do, pretty much starting from an empty shell. But I look forward to finally being able to put some of the things I learned in the DIY videos to use.

And, yeah, I’ll be taking another year off work.

IDEA 89: TAG THE TREES

Tree_Tags_Branch_1

Up in northern Michigan, the farm my dad grew up on sports some ancient apple orchards. The trees still produce, and the varieties are heirloom, if there ever were some. There’s not just the Jonathans, Macintosh and Golden Delicious, but Wealthy, Wagener, King and Alexander. Even now I can’t remember all the names, which is why this fall we made the rounds with my dad and we tagged the trees.

And it occurred to me, the project was so satisfying (and educational), why shouldn’t everyone do this with their own trees?

Of course most people don’t have an apple orchard in the family. But there really isn’t any reason you can’t identify and mark the trees you do have. Here’s what I did:

I bought aluminum tree tags online for the rich price of 100 for about ten bucks.

Tree_Tags_Blanks

You can write on these with a Sharpie if you like, but, not wanting to make things too easy on myself, I opted to purchase a set of “punches”. You can purchase the whole alphabet for about a dollar and a half per letter. My letters were about 1/4″ tall. There are lots of sets available. Just put “Letter Punch Set” in the search.

Tree_Tags_Letter_Punches_1

I bought aluminum wire and it came with a wire clipper in the package, which came in very handy.

Tree_Tags_Wire

And we cut long pieces, making sure to allow lots of room around the branches. We hung our tags much like a loose bangle bracelet, so as not to disturb the tree’s growth.

Tree_Tags_Branch_2

I learned a lot about our apple trees, but probably just as important, now our lovely trees sport shiny bangles that don’t just identify the fruit. Seeing the tags jiggle in the wind makes me smile as they betray the love with which these trees are cared for. It may not change the world, but it’s a very BellaPamella thing to do!

Tree_Tags_King

By the way, Happy Birthday, Dad. And thank you for sharing your knowledge, and your trees!

Tree_Tags_Dad

IDEA 65: REMEMBER TOGETHER

Memorial_book_1

Recently, we lost a very dear friend and relative. My mom’s sister, my sweet “Aunt Liz”.

Lizzie had a condition that wore her down slowly, with very little pain. So we were all blessed with a little time. Time to visit. Time to get used to the idea. Time to say good-bye.

And my sister had a really amazing idea. The idea was to create a book of Lizzie’s wonderful life. Creating a book of this sort isn’t the amazing part. Online publishers like My Publisher and Shutterfly make it a snap. But the ingenious part was, instead of doing so after she passed, we worked on it with her, while she was still with us.

Together, Liz and my mom combed photo albums to pick out favorites. Family members would create spreads, or send in thoughts and photos for the rest of the “editors” to make use of. Liz wrote wonderful detailed passages about her work, her travels, and her dreams, and of course corrected the occasional errant fact.

The wonderful pages full of her life stacked up. As her strength waned, we printed a copy so she could have it and share it with visitors at hospice. And once she was gone, we printed many copies, giving each person a means to reminisce.

By the way, you don’t even have to wait until someone is ill. A treasure like this can be started any time. Either way, why wait till someone is gone to express how very much they mean to you?

Memorial_book_2

IDEA 56: EXPRESS YOURSELF

Ring_holder

One of my favorite national magazines just did a contest. People sent in their ideas for using something that was meant for another purpose as an organizational tool. Of course I didn’t hear of the contest until it was in print. But if I had, I would have sent in this great idea my daughter had.

Most art supply stores have these posable figures meant to aid an artist doing figure drawing. My daughter fell in love with one and bought it for her room. Now she uses the perfect, posable arms to hold her rings and necklaces.

And, thus, she has begin to discover the art of “home dec”. She’s found not just a handy way to organize and display her rings, but something that does it in a personal way, that speaks to the artist within her.

Ring_holder_CU

IDEA 36: MAKE A BOO! BOOK

Kid_Book_1

Here’s a sweet project you can do this weekend. You might even challenge yourself to use only items you already have, although it is also fun to shop for some bright colored papers. The finished size and function of the book is up to you (and/or your child). We made a photo album for your Halloween pictures, and two smaller books your child can use as his or her drawing/sketch book, or journal. Here is what you will need to make a fun book project:

Kid_Book_2

First you need the covers, you can use card stock or, for a chunky book, craft foam. For the pages just use regular paper. It can be plain white printer paper, colored paper, even lined paper for a journal. You’ll also need rubber bands, a ruler, a hole punch, a mat knife or other cutter, and a fairly rigid skinny toy. For a Halloween costume album, choose a plastic snake or bug. You’ll see later that you can even use a crayon or colored pencil.

Cut the covers and all the pages to the same size. Our mini bug journal is 5″ x 6″. We used neon green craft foam for the covers (2 of them) and alternated pink and yellow paper to make the pages. Once everything is cut to size, use a plain piece of 5″ x 6″ paper to mark your hole punch placement. From the short edge (the spine edge) draw a line 5/8″ away from the edge. Then, on the line, make a mark 1 3/4″ down from the top and another 1 3/4″ up from the bottom edge. This is where you will punch your two holes. Punch them on your plain paper. Now you have the hole pattern for all pages.

Kid_Book_3

Use your pattern to punch all the pages and covers. You will probably not be able to punch the whole stack at once. Just do little stacks until they are all punched.

Kid_Book_4

You’re almost done! Now take a rubber band and pinch it so you can “lace” it trough the bottom hole from the back of the book to the front. Don’t worry if you can’t thread it all the way through. Just do a few pages at a time until you’re through the whole stack.

Kid_Book_5

Once you’ve got it through like this, stick the object into the loop to prevent the rubber band from pulling out when you do the next step!

Kid_Book_6

Now, just pull the rubber band tight from the back and thread it through the top hole just as you did the bottom one, back to front. Once you get it through the cover, loop it over the other end of the toy and Voila! You have a super fun and inspiring journal!

Kid_Book_8

For a creepy crawly Halloween costume album we used half sheets (5 1/2″ x 8 1/2″) of orange card stock for the cover and acid green for the pages. A black and orange plastic snake, and black photo corners finished the look. Your holes will be in different places depending on the size of your object and length of your rubber band. It’s usually best to center the two holes so the top hole is the same distance from the top edge as the bottom one is from the bottom edge.

Snake_Book_1

This book is just the right size for all the photos of all the kids in their costumes. Don’t forget to add new photos each year.

Snake_Book_2

And the simplest of all, the “sketch book” uses plain white printer paper, and a crayon or colored pencil to form the binding. This little book measures 5″ x 5″.

Crayon_Book

Now, just think of all the cool little books you can make with things around the house! Happy bookbinding!

IDEA 35: SCHOOL PORTRAIT BINDER

School_pics_notebook

One of the classic mementos of childhood is the annual school portrait that comes home in a big envelope. If you are organized, you will be able to locate the envelope when it comes time to send the pictures to the rellies, such as in the holiday card. But how many of you can put your finger on the photos from last year, or the year before?

Miraculously, I have a full set of my own school portraits from my childhood, and I’ve always been grateful that these precious artifacts survived in tact. Possibly because of this, I decided I needed a solution to house all my kids’ school photos. Here’s what works for me. As soon as we get the school pictures I simply three-hole punch the edge of the envelope where the flap is. (Making sure to shake the photos away from that edge first).

School_pics_holepunch

I purchased a 3″ (heavy duty) three ring binder. The picture envelopes of all my kids go into the binder, although if you prefer you could have a separate binder for each child. My binder has the option of slipping a photo under the clear plastic. So I made a black and white blow-up of a section of my son’s kindergarten class photo. Then I took some colored pencils and put color only on him. That picture slips in the front forming a sweet book cover!

School_pics_notebook_cover

I did the same for my other two children; one got the spine and the other got the back-side of the binder.

This system also works beautifully for team photos. Just hole-punch right through the cardboard frame that came on the photo. You can have a book dedicated to each child, or to each sport, or put them all in one, depending on the number of photos you’re collecting.

Team_photos_notebook

If you happened to see me demonstrate this idea on Twin Cities Live, and would like to see the rest of the projects I showed, click here, or click on the Twin Cities Live category to the right. And do let me know if you try any of them!